20. [Flink源码]YarnApplication模式的任务启动
20.1. 前瞻
上一回从源码层面简单分析了一个Flink任务是如何解析命令行参数,从而以ACTION RUN形式启动一个flink任务的。从flink run脚本接收到参数后,初始化一系列参数,调用parseAndRun(String[] args)方法,通过解析命令行传入的ACTION参数,以此来运行不同的模式(session模式、application模式),下文将会接着从源码层面尝试分析一个applicantion模式的应用是如何启动的。
下文引用的Flink源码基于Flink 1.17版本
20.2. parseAndRun
我们通常通过以下方式启动提交一个flink on yarn application的任务
./bin/flink run-application -t yarn-application ./examples/streaming/WordCount.jar
正常来说,我们会在命令行得到类似下面这样的日志输出:
[root@prd-cdp-gateway-03 flink-1.15.4]# ./bin/flink run-application \
>   -t yarn-application \
>   -Djobmanager.memory.process.size=1024m \
>   -Dtaskmanager.memory.process.size=1024m \
>   -c org.apache.flink.streaming.examples.wordcount.WordCount \
>   ./examples/streaming/WordCount.jar
Setting HBASE_CONF_DIR=/etc/hbase/conf because no HBASE_CONF_DIR was set.
SLF4J: Class path contains multiple SLF4J bindings.
SLF4J: Found binding in [jar:file:/path/to/flink/flink-1.15.4/lib/log4j-slf4j-impl-2.17.1.jar!/org/slf4j/impl/StaticLoggerBinder.class]
SLF4J: Found binding in [jar:file:/opt/cloudera/parcels/CDH-7.1.7-1.cdh7.1.7.p2046.46875634/jars/slf4j-reload4j-1.7.36.jar!/org/slf4j/impl/StaticLoggerBinder.class]
SLF4J: See http://www.slf4j.org/codes.html#multiple_bindings for an explanation.
SLF4J: Actual binding is of type [org.apache.logging.slf4j.Log4jLoggerFactory]
2025-03-14 00:06:42,231 INFO  org.apache.flink.yarn.cli.FlinkYarnSessionCli                [] - Found Yarn properties file under /tmp/.yarn-properties-root.
2025-03-14 00:06:42,231 INFO  org.apache.flink.yarn.cli.FlinkYarnSessionCli                [] - Found Yarn properties file under /tmp/.yarn-properties-root.
2025-03-14 00:06:42,555 INFO  org.apache.hadoop.security.UserGroupInformation              [] - Login successful for user template@TEMPLATE.COM using keytab file /root/keytabs/template.keytab. Keytab auto renewal enabled : false
2025-03-14 00:06:42,591 WARN  org.apache.flink.yarn.configuration.YarnLogConfigUtil        [] - The configuration directory ('/path/to/flink/flink-1.15.4/conf') already contains a LOG4J config file.If you want to use logback, then please delete or rename the log configuration file.
2025-03-14 00:06:42,880 INFO  org.apache.flink.yarn.YarnClusterDescriptor                  [] - No path for the flink jar passed. Using the location of class org.apache.flink.yarn.YarnClusterDescriptor to locate the jar
2025-03-14 00:06:43,052 INFO  org.apache.hadoop.conf.Configuration                         [] - resource-types.xml not found
2025-03-14 00:06:43,053 INFO  org.apache.hadoop.yarn.util.resource.ResourceUtils           [] - Unable to find 'resource-types.xml'.
2025-03-14 00:06:43,061 WARN  org.apache.flink.yarn.YarnClusterDescriptor                  [] - Neither the HADOOP_CONF_DIR nor the YARN_CONF_DIR environment variable is set. The Flink YARN Client needs one of these to be set to properly load the Hadoop configuration for accessing YARN.
2025-03-14 00:06:43,181 WARN  org.apache.flink.yarn.YarnClusterDescriptor                  [] - The specified queue ......
2025-03-14 00:06:43,198 INFO  org.apache.flink.yarn.YarnClusterDescriptor                  [] - Cluster specification: ClusterSpecification{masterMemoryMB=1024, taskManagerMemoryMB=1024, slotsPerTaskManager=1}
2025-03-14 00:06:56,893 INFO  org.apache.flink.yarn.YarnClusterDescriptor                  [] - Adding KRB5 configuration /etc/krb5.conf to the AM container local resource bucket
2025-03-14 00:06:56,916 INFO  org.apache.flink.yarn.YarnClusterDescriptor                  [] - Adding keytab /root/keytabs/template.keytab to the AM container local resource bucket
2025-03-14 00:06:56,943 INFO  org.apache.flink.yarn.YarnClusterDescriptor                  [] - Adding delegation token to the AM container.
2025-03-14 00:06:56,944 INFO  org.apache.flink.yarn.Utils                                  [] - Obtaining delegation tokens for HDFS and HBase.
2025-03-14 00:06:56,955 INFO  org.apache.hadoop.hdfs.DFSClient                             [] - Created token for scb: HDFS_DELEGATION_TOKEN owner=template@TEMPLATE.COM, renewer=yarn/bigdata-08.com@TEMPLATE.COM, realUser=, issueDate=1741882016949, maxDate=1742486816949, sequenceNumber=0, masterKeyId=0 on hadoop001.com:8020
2025-03-14 00:06:56,985 INFO  org.apache.hadoop.mapreduce.security.TokenCache              [] - Got dt for hdfs://hadoop001.com:8020; Kind: HDFS_DELEGATION_TOKEN, Service: hadoop001.com:8020, Ident: (token for template: HDFS_DELEGATION_TOKEN owner=template@TEMPLATE.COM, renewer=yarn/bigdata-08.com@TEMPLATE.COM, realUser=, issueDate=1741882016949, maxDate=1742486816949, sequenceNumber=0, masterKeyId=0)
2025-03-14 00:06:56,985 INFO  org.apache.flink.yarn.Utils                                  [] - Attempting to obtain Kerberos security token for HBase
2025-03-14 00:06:56,986 INFO  org.apache.flink.yarn.Utils                                  [] - HBase is not available (not packaged with this application): ClassNotFoundException : "org.apache.hadoop.hbase.HBaseConfiguration".
2025-03-14 00:06:56,992 INFO  org.apache.flink.yarn.YarnClusterDescriptor                  [] - Submitting application master application_1731047694332_1842988
2025-03-14 00:06:57,228 INFO  org.apache.hadoop.yarn.client.api.impl.YarnClientImpl        [] - Submitted application application_1731047694332_1842988
2025-03-14 00:06:57,228 INFO  org.apache.flink.yarn.YarnClusterDescriptor                  [] - Waiting for the cluster to be allocated
2025-03-14 00:06:57,231 INFO  org.apache.flink.yarn.YarnClusterDescriptor                  [] - Deploying cluster, current state ACCEPTED
2025-03-14 00:07:16,125 INFO  org.apache.flink.yarn.YarnClusterDescriptor                  [] - YARN application has been deployed successfully.
2025-03-14 00:07:16,127 INFO  org.apache.flink.yarn.YarnClusterDescriptor                  [] - Found Web Interface bigdata-34.com:34417 of application 'application_1731047694332_1842988'.
[root@prd-cdp-gateway-03 flink-1.15.4]#
提交命令背后所对应源码在org.apache.flink.client.cli.CliFrontend#parseAndRun
public int parseAndRun(String[] args) {

    // check for action
    if (args.length < 1) {
        CliFrontendParser.printHelp(customCommandLines);
        System.out.println("Please specify an action.");
        return 1;
    }

    // get action
    String action = args[0];

    // remove action from parameters
    final String[] params = Arrays.copyOfRange(args, 1, args.length);

    try {
        // do action
        switch (action) {
            case ACTION_RUN:
                run(params);
                return 0;
            case ACTION_RUN_APPLICATION:
                runApplication(params);
                return 0;
            case ACTION_LIST:
                list(params);
                return 0;
            case ACTION_INFO:
                info(params);
                return 0;
            case ACTION_CANCEL:
                cancel(params);
                return 0;
            case ACTION_STOP:
                stop(params);
                return 0;
            case ACTION_SAVEPOINT:
                savepoint(params);
                return 0;
            case "-h":
            case "--help":
                CliFrontendParser.printHelp(customCommandLines);
                return 0;
            case "-v":
            case "--version":
                ...
                return 1;
        }
    } catch (Exeception ce) {
        ......
    }
}
直接进入runApplication(String[] args),老样子,前面是一系列的参数校验和初始化,核心代码是:
......
final ApplicationDeployer deployer =
                new ApplicationClusterDeployer(clusterClientServiceLoader);
......
deployer.run(effectiveConfiguration, applicationConfiguration);
那么我们看下deployer.run在被调用的时候都干了什么,戳进run进去可以看到调用的是接口ApplicationDeployer的run方法,使用ctrl+H找到该接口的实现类,发现只有一个org.apache.flink.client.deployment.application.cli.ApplicationClusterDeployer,那么它的run方法如下:

在run方法里,使用了clientServiceLoader进行类加载,当看到ServiceLoader的时候,DNA动了,这是JAVA的SPI机制,OK,那么我们看下这个clientServiceLoader是如何初始化的,就是要找到,它在什么时候创建并且被传入的。
我们找到clusterClientServiceLoader被初始化的地方,返回到CliFrontend,
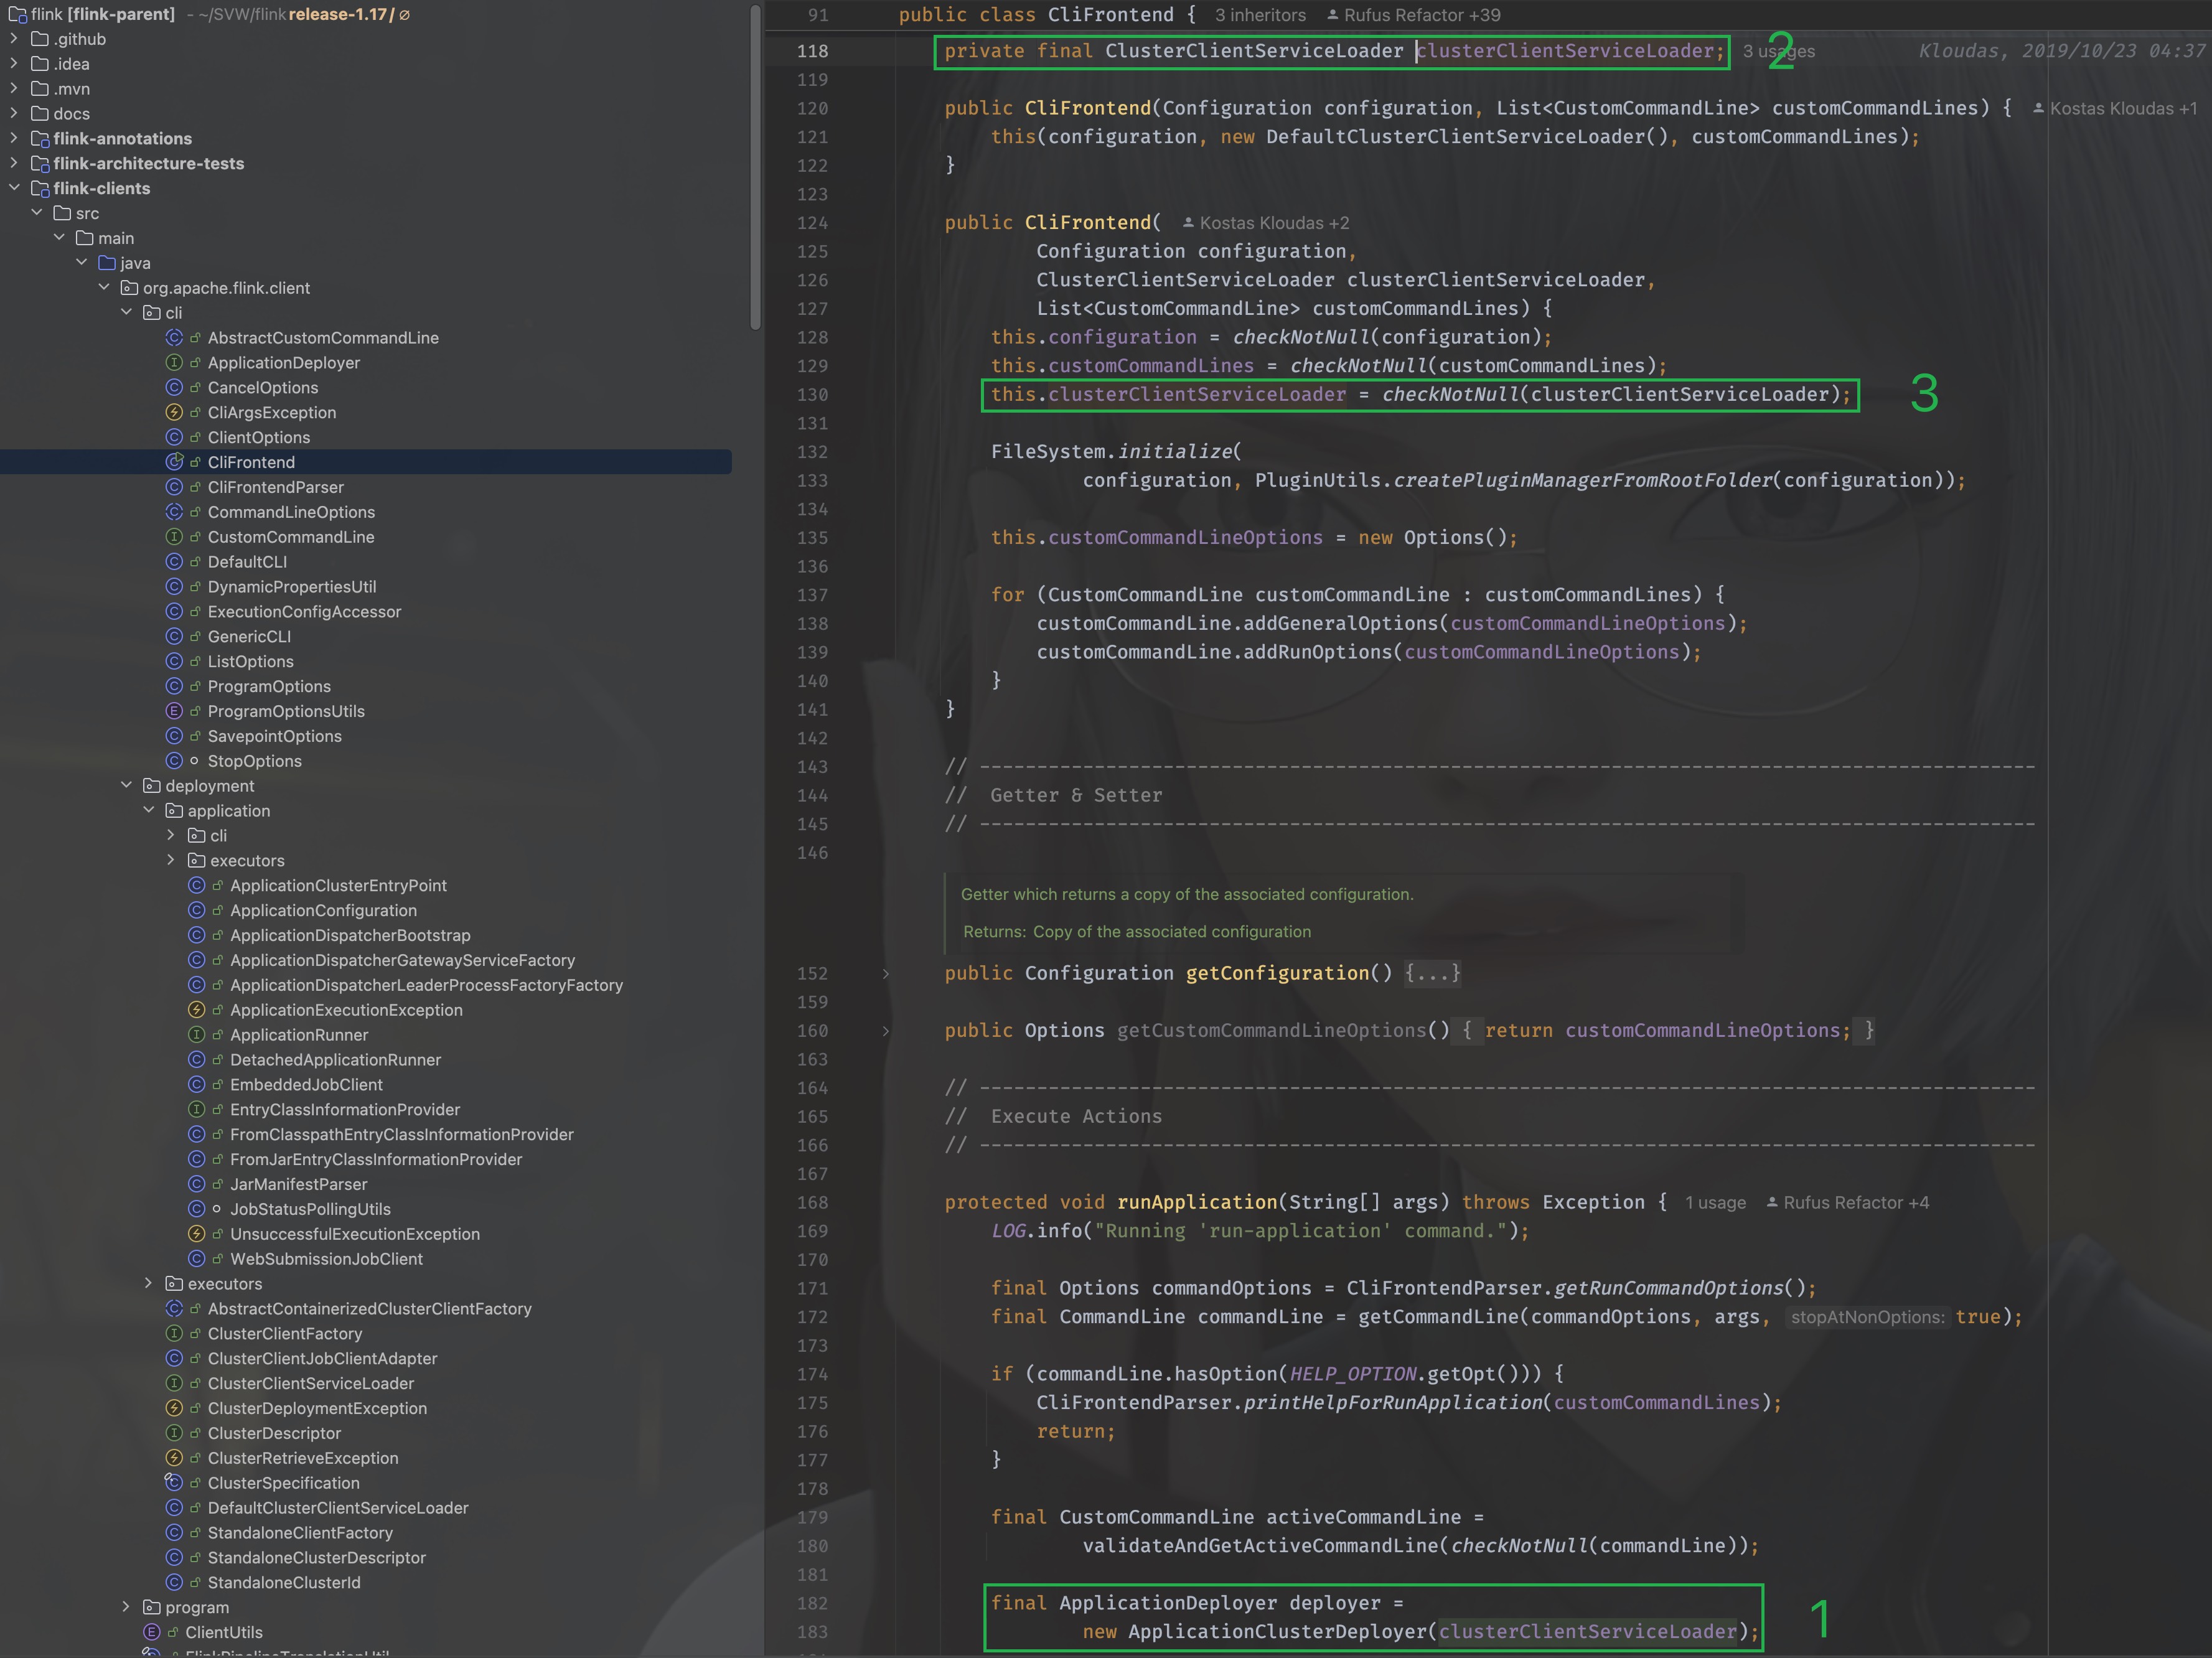
可以看到是在CliFrontend被构造的时候传入的,那么就找到它的构造方法:
public CliFrontend(Configuration configuration, List<CustomCommandLine> customCommandLines) {
    this(configuration, new DefaultClusterClientServiceLoader(), customCommandLines);
}
其实就在上图中,可以看到传入的是org.apache.flink.client.deployment.DefaultClusterClientServiceLoader, 那么,当clientServiceLoader.getClusterClientFactory(configuration)在执行时,其实调用的是org.apache.flink.client.deployment.DefaultClusterClientServiceLoader#getClusterClientFactory方法。

可以看到,它千辛万苦寻找的其实就是org.apache.flink.client.deployment.ClusterClientFactory的实现类,打开它的实现类可以发现一共有好几个
org.apache.flink.kubernetes.KubernetesClusterClientFactory
org.apache.flink.yarn.YarnClusterClientFactory
org.apache.flink.client.deployment.StandaloneClientFactory
用脚指头想都知道肯定是org.apache.flink.yarn.YarnClusterClientFactory,为什么呢?
因为他们的实现类都需要实现isCompatibleWith方法,只有YarnClusterClientFactory的方法里这个方法返回true,它解析的其实就是命令行传入的-t参数,当时我们传入的是yarn-application
./bin/flink run-application -t yarn-application ./examples/streaming/TopSpeedWindowing.jar
这个时候我们需要再回到org.apache.flink.client.deployment.application.cli.ApplicationClusterDeployer里,千万不要忘了来时的路,虽然很容易迷路。
同样的思路,我们很快能够定位到clusterDescriptor其实是org.apache.flink.yarn.YarnClusterDescriptor, 那么
clusterDescriptor.deployApplicationCluster(
        clusterSpecification, applicationConfiguration)
执行的其实就是org.apache.flink.yarn.YarnClusterDescriptor#deployApplicationCluster
20.2.1. 总结
        flowchart LR
    CliFrontend.main --> CliFrontend.mainInternal --> CliFrontend.parseAndRun
    CliFrontend.parseAndRun --> CliFrontend.runApplication --> ApplicationDeployer.run --> YarnClusterDescriptor.deployApplicationCluster
关于deployApplicationCluster的细节比较多,这里不作深入解析,只关注重要核心代码,尽量不干扰我们对于整个流程的理解
20.3. ApplicationMaster的启动
deployApplicationCluster会进行ApplicationMaster的启动
        graph LR
    deployApplicationCluster[deployApplicationCluster] --> deployInternal --> isReadyForDeployment
    isReadyForDeployment --> checkYarnQueues --> startAppMaster
关于startAppmater
        graph LR
初始化appContext --> resource[resource load] --> 将jobGraph暂存为文件 --> KRB[加载kerberos认证等配置文件]
KRB --> AMContainer[初始化AM Container context] --> AMContainerResources[上传AM Container文件]
--> 初始化ApplicationMasterEnv --> setApplicationNodeLabel --> setApplicationTags --> submitApplication
20.4. deployApplicationCluster
同样的,进入这个方法可以看到前面很多参数的校验以及初始化,忽略这些,我们直接进入关键代码

方法有详细的说明
Note
This method will block until the ApplicationMaster/JobManager have been deployed on YARN.
@param clusterSpecification Initial cluster specification for the Flink cluster to be deployed
@param applicationName name of the Yarn application to start
@param yarnClusterEntrypoint Class name of the Yarn cluster entry point.
@param jobGraph A job graph which is deployed with the Flink cluster, {@code null} if none
@param detached True if the cluster should be started in detached mode
注意到这个”Flink Application Cluster”没,当我们的任务不指定job name的时候,打开web ui的时候看到的默认就是它,除此之外,最核心的一个参数其实是(String yarnClusterEntrypoint), 这里传入的是YarnApplicationClusterEntryPoint.class.getName(), 其实这个deployInternal里面干的事儿就是启动ApplicationMaster/JobManager,当AM启动之后需要执行的入口类就是YarnApplicationClusterEntryPoint,不妨进入YarnApplicationClusterEntryPoint里看看都有些什么:

太好了!是main()方法,我们有救了!
同样地,配置参数配置及初始化我们都暂时忽略,直戳要害看重点,在main方法的最后:
YarnApplicationClusterEntryPoint yarnApplicationClusterEntrypoint =
        new YarnApplicationClusterEntryPoint(configuration, program);

ClusterEntrypoint.runClusterEntrypoint(yarnApplicationClusterEntrypoint);
new了一下自己,并调用ClusterEntrypoint.runClusterEntrypoint,进入这个方法:
public static void runClusterEntrypoint(ClusterEntrypoint clusterEntrypoint) {

    final String clusterEntrypointName = clusterEntrypoint.getClass().getSimpleName();
    try {
        clusterEntrypoint.startCluster();
    } catch (ClusterEntrypointException e) {
        LOG.error(
            String.format("Could not start cluster entrypoint %s.", clusterEntrypointName),
            e);
        System.exit(STARTUP_FAILURE_RETURN_CODE);
    }

    int returnCode;
    Throwable throwable = null;

    try {
        returnCode = clusterEntrypoint.getTerminationFuture().get().processExitCode();
    } catch (Throwable e) {
        throwable = ExceptionUtils.stripExecutionException(e);
        returnCode = RUNTIME_FAILURE_RETURN_CODE;
    }

    LOG.info(
        "Terminating cluster entrypoint process {} with exit code {}.",
        clusterEntrypointName,
        returnCode,
        throwable);
    System.exit(returnCode);
}
核心方法是:clusterEntrypoint.startCluster(); , 直接进入,我已经迫不及待看见它开始的地方了

同样地,进入runCluster这个方法,接下来,就是有点迷惑人的地方了,迷宫开始了。
20.5. runCluster
runCluster没有返回值,所以该做的事情,在这个方法里就做完了,所以究竟做了哪些事情呢?

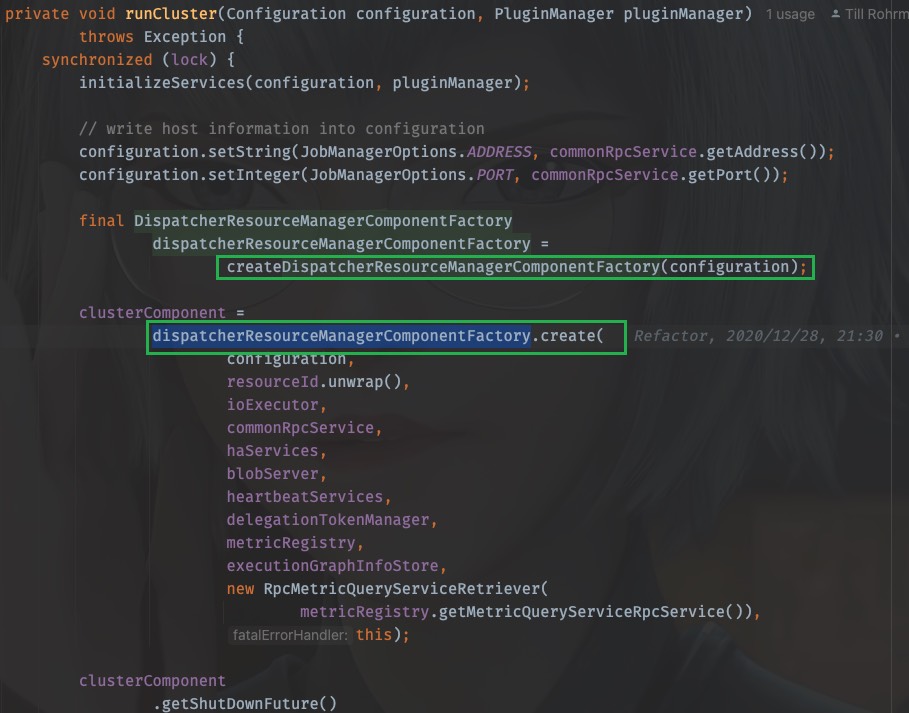
通过工厂类的命名可以猜到,需要创建dispatcher和resourceManager这两个组件,其实这两个组件也就是JobManager的核心组件,进入到这个工厂中,详细看看是如何创建的
20.5.1. DispatcherResourceManagerComponent
同样,戳进create方法,进入的是org.apache.flink.runtime.entrypoint.component.DispatcherResourceManagerComponentFactory这个工厂接口
它只有一个实现类就是org.apache.flink.runtime.entrypoint.component.DefaultDispatcherResourceManagerComponentFactory, 所以就看它的create方法即可
这个方法的方法体很长,同样,非核心的代码去掉暂时不看
什么?你哪知道哪些核心不核心?
这不好说呀,只能根据经验和方法命名来猜,如果你没猜错的话一定是猜对了。
@Override
public DispatcherResourceManagerComponent create(
    Configuration configuration,
    ResourceID resourceId,
    Executor ioExecutor,
    RpcService rpcService,
    HighAvailabilityServices highAvailabilityServices,
    BlobServer blobServer,
    HeartbeatServices heartbeatServices,
    DelegationTokenManager delegationTokenManager,
    MetricRegistry metricRegistry,
    ExecutionGraphInfoStore executionGraphInfoStore,
    MetricQueryServiceRetriever metricQueryServiceRetriever,
    FatalErrorHandler fatalErrorHandler)
    throws Exception {

    LeaderRetrievalService dispatcherLeaderRetrievalService = null;
    LeaderRetrievalService resourceManagerRetrievalService = null;
    WebMonitorEndpoint<?> webMonitorEndpoint = null;
    ResourceManagerService resourceManagerService = null;
    DispatcherRunner dispatcherRunner = null;

    try {
        dispatcherLeaderRetrievalService =
            highAvailabilityServices.getDispatcherLeaderRetriever();

        resourceManagerRetrievalService =
            highAvailabilityServices.getResourceManagerLeaderRetriever();

        final LeaderGatewayRetriever<DispatcherGateway> dispatcherGatewayRetriever =
            new RpcGatewayRetriever<>(
            rpcService,
            DispatcherGateway.class,
            DispatcherId::fromUuid,
            new ExponentialBackoffRetryStrategy(
                12, Duration.ofMillis(10), Duration.ofMillis(50)));

        final LeaderGatewayRetriever<ResourceManagerGateway> resourceManagerGatewayRetriever =
            new RpcGatewayRetriever<>(
            rpcService,
            ResourceManagerGateway.class,
            ResourceManagerId::fromUuid,
            new ExponentialBackoffRetryStrategy(
                12, Duration.ofMillis(10), Duration.ofMillis(50)));

        final ScheduledExecutorService executor =
            WebMonitorEndpoint.createExecutorService(
            configuration.getInteger(RestOptions.SERVER_NUM_THREADS),
            configuration.getInteger(RestOptions.SERVER_THREAD_PRIORITY),
            "DispatcherRestEndpoint");

        final long updateInterval =
            configuration.getLong(MetricOptions.METRIC_FETCHER_UPDATE_INTERVAL);
        final MetricFetcher metricFetcher =
            updateInterval == 0
            ? VoidMetricFetcher.INSTANCE
            : MetricFetcherImpl.fromConfiguration(
                configuration,
                metricQueryServiceRetriever,
                dispatcherGatewayRetriever,
                executor);

        webMonitorEndpoint =
            restEndpointFactory.createRestEndpoint(
            configuration,
            dispatcherGatewayRetriever,
            resourceManagerGatewayRetriever,
            blobServer,
            executor,
            metricFetcher,
            highAvailabilityServices.getClusterRestEndpointLeaderElectionService(),
            fatalErrorHandler);

        log.debug("Starting Dispatcher REST endpoint.");
        webMonitorEndpoint.start();

        final String hostname = RpcUtils.getHostname(rpcService);

        resourceManagerService =
            ResourceManagerServiceImpl.create(
            resourceManagerFactory,
            configuration,
            resourceId,
            rpcService,
            highAvailabilityServices,
            heartbeatServices,
            delegationTokenManager,
            fatalErrorHandler,
            new ClusterInformation(hostname, blobServer.getPort()),
            webMonitorEndpoint.getRestBaseUrl(),
            metricRegistry,
            hostname,
            ioExecutor);

        final HistoryServerArchivist historyServerArchivist =
            HistoryServerArchivist.createHistoryServerArchivist(
            configuration, webMonitorEndpoint, ioExecutor);

        final DispatcherOperationCaches dispatcherOperationCaches =
            new DispatcherOperationCaches(
            configuration.get(RestOptions.ASYNC_OPERATION_STORE_DURATION));

        final PartialDispatcherServices partialDispatcherServices =
            new PartialDispatcherServices(
            configuration,
            highAvailabilityServices,
            resourceManagerGatewayRetriever,
            blobServer,
            heartbeatServices,
            () ->
            JobManagerMetricGroup.createJobManagerMetricGroup(
                metricRegistry, hostname),
            executionGraphInfoStore,
            fatalErrorHandler,
            historyServerArchivist,
            metricRegistry.getMetricQueryServiceGatewayRpcAddress(),
            ioExecutor,
            dispatcherOperationCaches);

        log.debug("Starting Dispatcher.");
        dispatcherRunner =
            dispatcherRunnerFactory.createDispatcherRunner(
            highAvailabilityServices.getDispatcherLeaderElectionService(),
            fatalErrorHandler,
            new HaServicesJobPersistenceComponentFactory(highAvailabilityServices),
            ioExecutor,
            rpcService,
            partialDispatcherServices);

        log.debug("Starting ResourceManagerService.");
        resourceManagerService.start();

        resourceManagerRetrievalService.start(resourceManagerGatewayRetriever);
        dispatcherLeaderRetrievalService.start(dispatcherGatewayRetriever);

        return new DispatcherResourceManagerComponent(
            dispatcherRunner,
            resourceManagerService,
            dispatcherLeaderRetrievalService,
            resourceManagerRetrievalService,
            webMonitorEndpoint,
            fatalErrorHandler,
            dispatcherOperationCaches);

    } catch (Exception exception) {
        // clean up all started components
        if (dispatcherLeaderRetrievalService != null) {
            try {
                dispatcherLeaderRetrievalService.stop();
            } catch (Exception e) {
                exception = ExceptionUtils.firstOrSuppressed(e, exception);
            }
        }

        if (resourceManagerRetrievalService != null) {
            try {
                resourceManagerRetrievalService.stop();
            } catch (Exception e) {
                exception = ExceptionUtils.firstOrSuppressed(e, exception);
            }
        }

        final Collection<CompletableFuture<Void>> terminationFutures = new ArrayList<>(3);

        ......
    }
从上往下看,可以知道,在一系列组件被创建之后就一并执行了,这里创建了webMonitorEndpoint、resourceManagerService、resourceManagerRetrievalService、dispatcherLeaderRetrievalService,并且返回了一个DispatcherResourceManagerComponent
20.5.2. resourceManagerService的创建
来看看resourceManagerService是如何创建的,它的创建通过调用ResourceManagerServiceImpl的create方法进行创建,
resourceManagerService =
        ResourceManagerServiceImpl.create(
                resourceManagerFactory,
                configuration,
                resourceId,
                rpcService,
                highAvailabilityServices,
                heartbeatServices,
                delegationTokenManager,
                fatalErrorHandler,
                new ClusterInformation(hostname, blobServer.getPort()),
                webMonitorEndpoint.getRestBaseUrl(),
                metricRegistry,
                hostname,
                ioExecutor);
戳进去,会发现就是它自己,之后调用了start()方法进行启动
20.5.3. dispatcherRunner的创建
dispatcherRunner和resourceManagerService的创建在同一个地方
dispatcherRunner =
        dispatcherRunnerFactory.createDispatcherRunner(
                highAvailabilityServices.getDispatcherLeaderElectionService(),
                fatalErrorHandler,
                new HaServicesJobPersistenceComponentFactory(highAvailabilityServices),
                ioExecutor,
                rpcService,
                partialDispatcherServices);
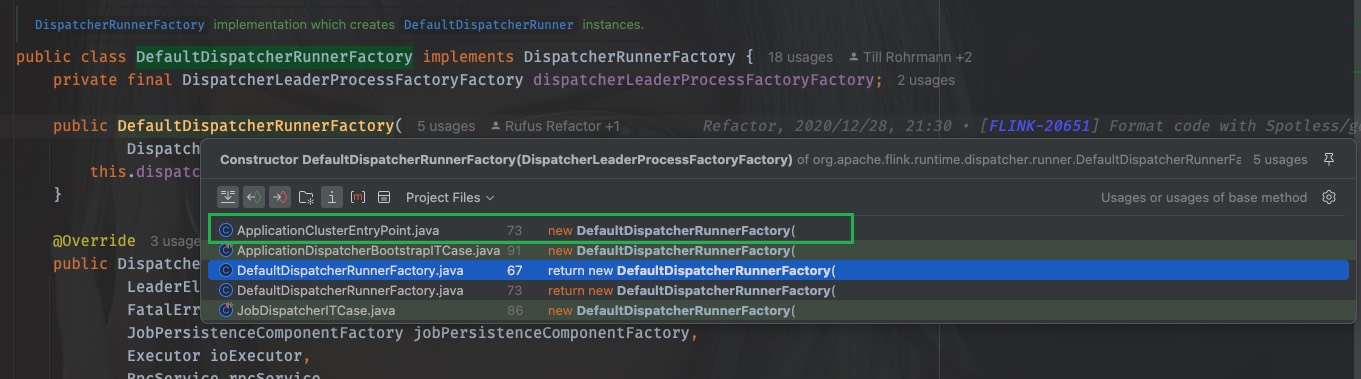
进入createDispatcherRunner方法,发现来到了org.apache.flink.runtime.dispatcher.runner.DispatcherRunnerFactory这个接口中,找一下他的实现类,发现只有一个实现类:org.apache.flink.runtime.dispatcher.runner.DefaultDispatcherRunnerFactory
找到它的createDispatcherRunner方法:
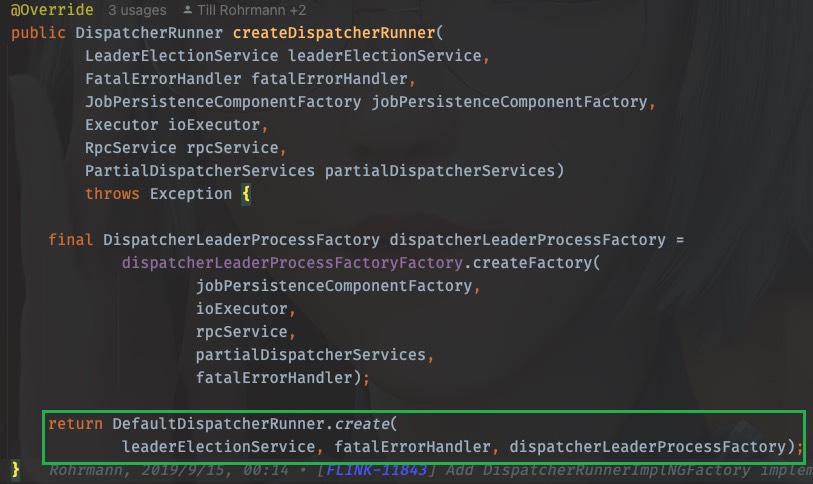
@Override
public DispatcherRunner createDispatcherRunner(
        LeaderElectionService leaderElectionService,
        FatalErrorHandler fatalErrorHandler,
        JobPersistenceComponentFactory jobPersistenceComponentFactory,
        Executor ioExecutor,
        RpcService rpcService,
        PartialDispatcherServices partialDispatcherServices)
        throws Exception {

    final DispatcherLeaderProcessFactory dispatcherLeaderProcessFactory =
            dispatcherLeaderProcessFactoryFactory.createFactory(
                    jobPersistenceComponentFactory,
                    ioExecutor,
                    rpcService,
                    partialDispatcherServices,
                    fatalErrorHandler);

    return DefaultDispatcherRunner.create(
            leaderElectionService, fatalErrorHandler, dispatcherLeaderProcessFactory);
}
可以看到最后一行调用create来创建dispatcherRunner,它接收三个参数
leaderElectionService
fatalErrorHandler
dispatcherLeaderProcessFactory
根据参数名,自然可以想到,核心的参数是第一个和第三个,在继续深入之前,我们来看下这个leaderElectionService和dispatcherLeaderProcessFactory都是在什么时候创建和初始化的
20.5.3.1. leaderElectionService
OK,我们一路逆着往上,回到开始的地方,注意,从现在开始,和之前不同的是,我们需要一路回退。
如果把之前的动作比作是剥洋葱,一边剥一边流泪,那么现在的步骤就好似是包洋葱。
在create之前,这个leaderElectionService是由createDispatcherRunner的调用者传入的,也就是在刚刚看到的dispatcherRunner在创建的地方
dispatcherRunner =
        dispatcherRunnerFactory.createDispatcherRunner(
                highAvailabilityServices.getDispatcherLeaderElectionService(),
                fatalErrorHandler,
                new HaServicesJobPersistenceComponentFactory(highAvailabilityServices),
                ioExecutor,
                rpcService,
                partialDispatcherServices);
这里传入了highAvailabilityServices.getDispatcherLeaderElectionService()
那么这个highAvailabilityServices又是什么呢?继续回退,找到它被初始化和传入的地方,它经过org.apache.flink.runtime.entrypoint.component.DefaultDispatcherResourceManagerComponentFactory#create方法被传入,这个create方法在两个地方被调用

我们一开始是从ClusterEntrypoint过来的,所以得回到这里面去
clusterComponent =
        dispatcherResourceManagerComponentFactory.create(
                configuration,
                resourceId.unwrap(),
                ioExecutor,
                commonRpcService,
                haServices,
                blobServer,
                heartbeatServices,
                delegationTokenManager,
                metricRegistry,
                executionGraphInfoStore,
                new RpcMetricQueryServiceRetriever(
                        metricRegistry.getMetricQueryServiceRpcService()),
                this);
第5个参数就是我们要找到的highAvailabilityServices,继续找到它被初始化的地方,可以看到它在initializeServices(Configuration configuration, PluginManager pluginManager)方法中被创建
haServices = createHaServices(configuration, ioExecutor, rpcSystem);
initializeServices的调用也就在runCluster方法中,作用是在启动集群之前,初始化一系列参数配置
进入createHaServices(org.apache.flink.runtime.entrypoint.ClusterEntrypoint#createHaServices)方法,它调用了HighAvailabilityServicesUtils.createHighAvailabilityServices方法进行创建高可用服务
public static HighAvailabilityServices createHighAvailabilityServices(
        Configuration configuration,
        Executor executor,
        AddressResolution addressResolution,
        RpcSystemUtils rpcSystemUtils,
        FatalErrorHandler fatalErrorHandler)
        throws Exception {

    HighAvailabilityMode highAvailabilityMode = HighAvailabilityMode.fromConfig(configuration);

    switch (highAvailabilityMode) {
        case NONE:
            final Tuple2<String, Integer> hostnamePort = getJobManagerAddress(configuration);

            final String resourceManagerRpcUrl =
                    rpcSystemUtils.getRpcUrl(
                            hostnamePort.f0,
                            hostnamePort.f1,
                            RpcServiceUtils.createWildcardName(
                                    ResourceManager.RESOURCE_MANAGER_NAME),
                            addressResolution,
                            configuration);
            final String dispatcherRpcUrl =
                    rpcSystemUtils.getRpcUrl(
                            hostnamePort.f0,
                            hostnamePort.f1,
                            RpcServiceUtils.createWildcardName(Dispatcher.DISPATCHER_NAME),
                            addressResolution,
                            configuration);
            final String webMonitorAddress =
                    getWebMonitorAddress(configuration, addressResolution);

            return new StandaloneHaServices(
                    resourceManagerRpcUrl, dispatcherRpcUrl, webMonitorAddress);
        case ZOOKEEPER:
            return createZooKeeperHaServices(configuration, executor, fatalErrorHandler);
        case KUBERNETES:
            return createCustomHAServices(
                    "org.apache.flink.kubernetes.highavailability.KubernetesHaServicesFactory",
                    configuration,
                    executor);

        case FACTORY_CLASS:
            return createCustomHAServices(configuration, executor);

        default:
            throw new Exception("Recovery mode " + highAvailabilityMode + " is not supported.");
    }
}
这里分模式创建不同的Service,模式的区分由HighAvailabilityMode.fromConfig(configuration);解析得到,它解析的是flink-conf.yaml文件中的high-availability.type或者是high-availability,如果不作特别配置,默认是NONE
那么,这里得到的是org.apache.flink.runtime.highavailability.nonha.standalone.StandaloneHaServices
20.5.3.2. dispatcherLeaderProcessFactory
再来看看dispatcherLeaderProcessFactory是在什么地方被初始化和传入的,包洋葱🧅开始
首先来到了它的创建:
final DispatcherLeaderProcessFactory dispatcherLeaderProcessFactory =
        dispatcherLeaderProcessFactoryFactory.createFactory(
                jobPersistenceComponentFactory,
                ioExecutor,
                rpcService,
                partialDispatcherServices,
                fatalErrorHandler);
它由一个工厂的工厂进行创建,dispatcherLeaderProcessFactoryFactory是一个创建工厂的工厂类,那么找到它的赋值的地方,继续往上发现它是DefaultDispatcherRunnerFactory的构造参数,它的调用有三个地方,后两者都是在自己内部,第一个才是我们要找的
@Override
protected DispatcherResourceManagerComponentFactory
        createDispatcherResourceManagerComponentFactory(final Configuration configuration) {
    return new DefaultDispatcherResourceManagerComponentFactory(
            new DefaultDispatcherRunnerFactory(
                    ApplicationDispatcherLeaderProcessFactoryFactory.create(
                            configuration, SessionDispatcherFactory.INSTANCE, program)),
            resourceManagerFactory,
            JobRestEndpointFactory.INSTANCE);
}
这里可以看到调用了ApplicationDispatcherLeaderProcessFactoryFactory的create方法进行创建,
ApplicationDispatcherLeaderProcessFactoryFactory.create(
                            configuration, SessionDispatcherFactory.INSTANCE, program))
第二个参数传入的是一个SessionDispatcherFactory
进入create方法,其实就是创建了一个自己:ApplicationDispatcherLeaderProcessFactoryFactory
传入的dispatcherFactory是刚刚得到的SessionDispatcherFactory,到这里,差不多工作都做好了,我们都只是得到了一些列工厂的接口,并没有调用它们的方法,那么一定有一个地方进行抽象地调用。
我们再到createDispatcherResourceManagerComponentFactory这个方法被调用的地方,只有一个调用的地方
在ClusterEntryPoint里

发现,又回到了我们之前去过的runCluster方法中
工厂在上面被创建,在下面被调用
同样的,进入create方法,实际执行是DefaultDispatcherResourceManagerComponentFactory.create,先前看到的dispatcherRunnerFactory其实就是
new DefaultDispatcherRunnerFactory(
                        ApplicationDispatcherLeaderProcessFactoryFactory.create(
                                configuration, SessionDispatcherFactory.INSTANCE, program))
当调用dispatcherRunnerFactory.createDispatcherRunner时,
dispatcherRunner =
        dispatcherRunnerFactory.createDispatcherRunner(
                highAvailabilityServices.getDispatcherLeaderElectionService(),
                fatalErrorHandler,
                new HaServicesJobPersistenceComponentFactory(highAvailabilityServices),
                ioExecutor,
                rpcService,
                partialDispatcherServices);
我们应该去看DefaultDispatcherRunnerFactory的createDispatcherRunner方法
@Override
public DispatcherRunner createDispatcherRunner(
        LeaderElectionService leaderElectionService,
        FatalErrorHandler fatalErrorHandler,
        JobPersistenceComponentFactory jobPersistenceComponentFactory,
        Executor ioExecutor,
        RpcService rpcService,
        PartialDispatcherServices partialDispatcherServices)
        throws Exception {

    final DispatcherLeaderProcessFactory dispatcherLeaderProcessFactory =
            dispatcherLeaderProcessFactoryFactory.createFactory(
                    jobPersistenceComponentFactory,
                    ioExecutor,
                    rpcService,
                    partialDispatcherServices,
                    fatalErrorHandler);

    return DefaultDispatcherRunner.create(
            leaderElectionService, fatalErrorHandler, dispatcherLeaderProcessFactory);
}
好家伙!回到了开头,此时已经知道了dispatcherLeaderProcessFactoryFactory是什么。
就是刚才看到的ApplicationDispatcherLeaderProcessFactoryFactory,
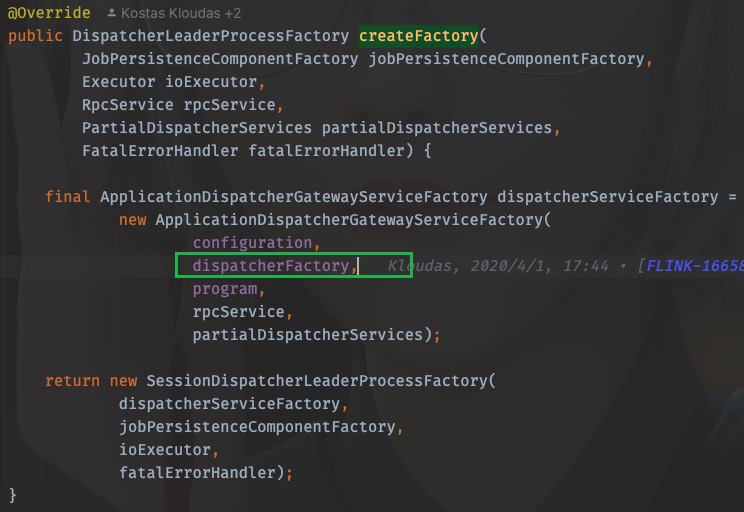
那么当调用createFactory的时候就是调用org.apache.flink.client.deployment.application.ApplicationDispatcherLeaderProcessFactoryFactory#createFactory
最后创建了一个SessionDispatcherLeaderProcessFactory
@Override
public DispatcherLeaderProcessFactory createFactory(
        JobPersistenceComponentFactory jobPersistenceComponentFactory,
        Executor ioExecutor,
        RpcService rpcService,
        PartialDispatcherServices partialDispatcherServices,
        FatalErrorHandler fatalErrorHandler) {

    final ApplicationDispatcherGatewayServiceFactory dispatcherServiceFactory =
            new ApplicationDispatcherGatewayServiceFactory(
                    configuration,
                    dispatcherFactory,
                    program,
                    rpcService,
                    partialDispatcherServices);

    return new SessionDispatcherLeaderProcessFactory(
            dispatcherServiceFactory,
            jobPersistenceComponentFactory,
            ioExecutor,
            fatalErrorHandler);
}
还记得吗?new ApplicationDispatcherGatewayServiceFactory传入的dispatcherFactory就是SessionDispatcherFactory.INSTANCE
那么,dispatcherLeaderProcessFactory其实就是SessionDispatcherLeaderProcessFactory
至此,创建dispatcherRunner需要的leaderElectionService和dispatcherLeaderProcessFactory都知道了,包洋葱结束。
再总结一下:
dispatcherRunnerFactory.createDispatcherRunner
leaderElectionService
StandaloneHaServices
dispatcherLeaderProcessFactory
SessionDispatcherLeaderProcessFactory
20.5.3.3. createAndStart
需要的都准备好了,我们进入create方法
进入这个方法:
public static DispatcherRunner create(
        LeaderElectionService leaderElectionService,
        FatalErrorHandler fatalErrorHandler,
        DispatcherLeaderProcessFactory dispatcherLeaderProcessFactory)
        throws Exception {
    final DefaultDispatcherRunner dispatcherRunner =
            new DefaultDispatcherRunner(
                    leaderElectionService, fatalErrorHandler, dispatcherLeaderProcessFactory);
    dispatcherRunner.start();
    return dispatcherRunner;
}
可以看到,dispatcherRunner在这里创建也在这里启动
终于!
OHHHHHHHHHHHHHHHHH!(表情包)
20.5.4. 深入dispatcherRunner的启动
进入dispatcherRunner的start方法,
void start() throws Exception {
    leaderElectionService.start(this);
}
这个leaderElectionService刚才我们已经知道了是StandaloneHaServices,那就去StandaloneHaServices中看看start()都做了啥
@Override
public void start(LeaderContender newContender) throws Exception {
    if (contender != null) {
        // Service was already started
        throw new IllegalArgumentException(
                "Leader election service cannot be started multiple times.");
    }

    contender = Preconditions.checkNotNull(newContender);

    // directly grant leadership to the given contender
    contender.grantLeadership(HighAvailabilityServices.DEFAULT_LEADER_ID);
}
这个contender就是刚才的DefaultDispatcherRunner,上面是参数校验,直接看最后一行,这里调用了grantLeadership(),那么应该看DefaultDispatcherRunner的grantLeadership方法,OK,我们回去,又要开始剥洋葱了
@Override
public void grantLeadership(UUID leaderSessionID) {
    runActionIfRunning(
            () -> {
                LOG.info(
                        "{} was granted leadership with leader id {}. Creating new {}.",
                        getClass().getSimpleName(),
                        leaderSessionID,
                        DispatcherLeaderProcess.class.getSimpleName());
                startNewDispatcherLeaderProcess(leaderSessionID);
            });
}
这里使用lambda表达式调用了,startNewDispatcherLeaderProcess(leaderSessionID),直接进入
private void startNewDispatcherLeaderProcess(UUID leaderSessionID) {
    stopDispatcherLeaderProcess();

    dispatcherLeaderProcess = createNewDispatcherLeaderProcess(leaderSessionID);

    final DispatcherLeaderProcess newDispatcherLeaderProcess = dispatcherLeaderProcess;
    FutureUtils.assertNoException(
            previousDispatcherLeaderProcessTerminationFuture.thenRun(
                    newDispatcherLeaderProcess::start));
}
这里是1、先创建(createNewDispatcherLeaderProcess(leaderSessionID))2、再执行(newDispatcherLeaderProcess::start)
那就先看创建
private DispatcherLeaderProcess createNewDispatcherLeaderProcess(UUID leaderSessionID) {
    final DispatcherLeaderProcess newDispatcherLeaderProcess =
            dispatcherLeaderProcessFactory.create(leaderSessionID);

    forwardShutDownFuture(newDispatcherLeaderProcess);
    forwardConfirmLeaderSessionFuture(leaderSessionID, newDispatcherLeaderProcess);

    return newDispatcherLeaderProcess;
}
这里调用了dispatcherLeaderProcessFactory的create方法,在前文已经知道,这个dispatcherLeaderProcessFactory由DefaultDispatcherRunner的构造方法传入,其实就是SessionDispatcherLeaderProcessFactory
那么我们直接看SessionDispatcherLeaderProcessFactory的create方法
从这里戳create方法进入接口类,ctrl+H找到实现类,戳SessionDispatcherLeaderProcessFactory进入
@Override
public DispatcherLeaderProcess create(UUID leaderSessionID) {
    return SessionDispatcherLeaderProcess.create(
            leaderSessionID,
            dispatcherGatewayServiceFactory,
            jobPersistenceComponentFactory.createJobGraphStore(),
            jobPersistenceComponentFactory.createJobResultStore(),
            ioExecutor,
            fatalErrorHandler);
}
这里还需要传入一个dispatcherGatewayServiceFactory,由前文已经知道,它就是ApplicationDispatcherGatewayServiceFactory,而创建ApplicationDispatcherGatewayServiceFactory也需要一个dispatcherFactory,即是SessionDispatcherFactory.INSTANCE
继续进入SessionDispatcherLeaderProcess.create
public static SessionDispatcherLeaderProcess create(
        UUID leaderSessionId,
        DispatcherGatewayServiceFactory dispatcherFactory,
        JobGraphStore jobGraphStore,
        JobResultStore jobResultStore,
        Executor ioExecutor,
        FatalErrorHandler fatalErrorHandler) {
    return new SessionDispatcherLeaderProcess(
            leaderSessionId,
            dispatcherFactory,
            jobGraphStore,
            jobResultStore,
            ioExecutor,
            fatalErrorHandler);
}
发现其实就是创建了一个自己:SessionDispatcherLeaderProcess,现在回去,现在只是分析了第一步”创建“,下一步是”执行“,回到
org.apache.flink.runtime.dispatcher.runner.DefaultDispatcherRunner#startNewDispatcherLeaderProcess方法中,目光聚焦于:newDispatcherLeaderProcess::start
戳start进入,发现是DispatcherLeaderProcess接口类
interface DispatcherLeaderProcess extends AutoCloseableAsync {

    void start();

    UUID getLeaderSessionId();

    CompletableFuture<DispatcherGateway> getDispatcherGateway();

    CompletableFuture<String> getLeaderAddressFuture();

    CompletableFuture<ApplicationStatus> getShutDownFuture();
}
那么我们应该去实现类org.apache.flink.runtime.dispatcher.runner.SessionDispatcherLeaderProcess中一探究竟:
找到它的start()方法,发现没有,只能去它的父类中找start()方法,父类是AbstractDispatcherLeaderProcess
@Override
public final void start() {
    runIfStateIs(State.CREATED, this::startInternal);
}
又是一个lambda表达式调用,进入startInternal
private void startInternal() {
    log.info("Start {}.", getClass().getSimpleName());
    state = State.RUNNING;
    onStart();
}
进入onStart();发现是一个抽象方法
protected abstract void onStart();
那这个时候就要去看子类了,回到SessionDispatcherLeaderProcess中找到onStart()方法
@Override
protected void onStart() {
    startServices();

    onGoingRecoveryOperation =
            createDispatcherBasedOnRecoveredJobGraphsAndRecoveredDirtyJobResults();
}
两个方法,一个一个看,先看startServices();
private void startServices() {
    try {
        jobGraphStore.start(this);
    } catch (Exception e) {
        throw new FlinkRuntimeException(
                String.format(
                        "Could not start %s when trying to start the %s.",
                        jobGraphStore.getClass().getSimpleName(), getClass().getSimpleName()),
                e);
    }
}
这一看,和jobGraph有关,先忽略
再看createDispatcherBasedOnRecoveredJobGraphsAndRecoveredDirtyJobResults()
private CompletableFuture<Void>
        createDispatcherBasedOnRecoveredJobGraphsAndRecoveredDirtyJobResults() {
    final CompletableFuture<Collection<JobResult>> dirtyJobsFuture =
            CompletableFuture.supplyAsync(this::getDirtyJobResultsIfRunning, ioExecutor);

    return dirtyJobsFuture
            .thenApplyAsync(
                    dirtyJobs ->
                            this.recoverJobsIfRunning(
                                    dirtyJobs.stream()
                                            .map(JobResult::getJobId)
                                            .collect(Collectors.toSet())),
                    ioExecutor)
            .thenAcceptBoth(dirtyJobsFuture, this::createDispatcherIfRunning)
            .handle(this::onErrorIfRunning);
}
又是lambda调用,进入this::createDispatcherIfRunning
private void createDispatcherIfRunning(
        Collection<JobGraph> jobGraphs, Collection<JobResult> recoveredDirtyJobResults) {
    runIfStateIs(State.RUNNING, () -> createDispatcher(jobGraphs, recoveredDirtyJobResults));
}
同lambda,进入createDispatcher(jobGraphs, recoveredDirtyJobResults)
private void createDispatcher(
        Collection<JobGraph> jobGraphs, Collection<JobResult> recoveredDirtyJobResults) {

    final DispatcherGatewayService dispatcherService =
            dispatcherGatewayServiceFactory.create(
                    DispatcherId.fromUuid(getLeaderSessionId()),
                    jobGraphs,
                    recoveredDirtyJobResults,
                    jobGraphStore,
                    jobResultStore);

    completeDispatcherSetup(dispatcherService);
}
终于,在这里调用了dispatcherGatewayServiceFactory的create方法,这个dispatcherGatewayServiceFactory就是前文已经探究过的ApplicationDispatcherGatewayServiceFactory,
我们戳create进入,发现来到的是抽象类org.apache.flink.runtime.dispatcher.runner.AbstractDispatcherLeaderProcess中,来到了一个内部接口
public interface DispatcherGatewayServiceFactory {
    DispatcherGatewayService create(
            DispatcherId dispatcherId,
            Collection<JobGraph> recoveredJobs,
            Collection<JobResult> recoveredDirtyJobResults,
            JobGraphWriter jobGraphWriter,
            JobResultStore jobResultStore);
}
ctrl+H找到实现类,找到create方法
@Override
public AbstractDispatcherLeaderProcess.DispatcherGatewayService create(
        DispatcherId fencingToken,
        Collection<JobGraph> recoveredJobs,
        Collection<JobResult> recoveredDirtyJobResults,
        JobGraphWriter jobGraphWriter,
        JobResultStore jobResultStore) {

    final List<JobID> recoveredJobIds = getRecoveredJobIds(recoveredJobs);

    final Dispatcher dispatcher;
    try {
        dispatcher =
                dispatcherFactory.createDispatcher(
                        rpcService,
                        fencingToken,
                        recoveredJobs,
                        recoveredDirtyJobResults,
                        (dispatcherGateway, scheduledExecutor, errorHandler) ->
                                new ApplicationDispatcherBootstrap(
                                        application,
                                        recoveredJobIds,
                                        configuration,
                                        dispatcherGateway,
                                        scheduledExecutor,
                                        errorHandler),
                        PartialDispatcherServicesWithJobPersistenceComponents.from(
                                partialDispatcherServices, jobGraphWriter, jobResultStore));
    } catch (Exception e) {
        throw new FlinkRuntimeException("Could not create the Dispatcher rpc endpoint.", e);
    }

    dispatcher.start();

    return DefaultDispatcherGatewayService.from(dispatcher);
}
这里调用了dispatcherFactory.createDispatcher()来创建dispatcher,那么需要弄清楚这个dispatcherFactory是什么
一路按照调用链返回,先是来到了ApplicationDispatcherLeaderProcessFactoryFactory中
前文已经探究过,这里的dispatcherFactory就是SessionDispatcherFactory.INSTANCE
所以,这里dispatcherFactory.createDispatcher的调用,应该看SessionDispatcherFactory.INSTANCE中的createDispatcher方法,同样的,戳createDispatcher进去,ctrl+H也能找到实现类,从而找到createDispatcher方法
@Override
public StandaloneDispatcher createDispatcher(
        RpcService rpcService,
        DispatcherId fencingToken,
        Collection<JobGraph> recoveredJobs,
        Collection<JobResult> recoveredDirtyJobResults,
        DispatcherBootstrapFactory dispatcherBootstrapFactory,
        PartialDispatcherServicesWithJobPersistenceComponents
                partialDispatcherServicesWithJobPersistenceComponents)
        throws Exception {
    // create the default dispatcher
    return new StandaloneDispatcher(
            rpcService,
            fencingToken,
            recoveredJobs,
            recoveredDirtyJobResults,
            dispatcherBootstrapFactory,
            DispatcherServices.from(
                    partialDispatcherServicesWithJobPersistenceComponents,
                    JobMasterServiceLeadershipRunnerFactory.INSTANCE,
                    CheckpointResourcesCleanupRunnerFactory.INSTANCE));
}
进入StandaloneDispatcher,发现继承自org.apache.flink.runtime.dispatcher.Dispatcher
到这里已经知道dispatcherFactory.createDispatcher创建的dispatcher即是StandaloneDispatcher
当调用dispatcher.start()时,运行的即是StandaloneDispatcher的start方法,而StandaloneDispatcher并没有这个方法体,所以方法来自于父类org.apache.flink.runtime.dispatcher.Dispatcher,
OK,戳一下dispatcher.start(),发现来到的是org.apache.flink.runtime.rpc.RpcEndpoint,并不是Dispatcher,
20.5.4.1. 启动JobMaster
其实这里使用的是RPC调用,应该去看Dispatcher的onStart()方法
@Override
public void onStart() throws Exception {
    try {
        startDispatcherServices();
    } catch (Throwable t) {
        final DispatcherException exception =
                new DispatcherException(
                        String.format("Could not start the Dispatcher %s", getAddress()), t);
        onFatalError(exception);
        throw exception;
    }

    startCleanupRetries();
    startRecoveredJobs();

    this.dispatcherBootstrap =
            this.dispatcherBootstrapFactory.create(
                    getSelfGateway(DispatcherGateway.class),
                    this.getRpcService().getScheduledExecutor(),
                    this::onFatalError);
}
一个一个看之后,
startDispatcherServices()这个方法进行metrics的注册
startCleanupRetries()进行metrics的清理
startRecoveredJobs()运行job
private void startRecoveredJobs() {
    for (JobGraph recoveredJob : recoveredJobs) {
        runRecoveredJob(recoveredJob);
    }
    recoveredJobs.clear();
}
runRecoveredJob
private void runRecoveredJob(final JobGraph recoveredJob) {
    checkNotNull(recoveredJob);

    initJobClientExpiredTime(recoveredJob);

    try {
        runJob(createJobMasterRunner(recoveredJob), ExecutionType.RECOVERY);
    } catch (Throwable throwable) {
        onFatalError(
                new DispatcherException(
                        String.format(
                                "Could not start recovered job %s.", recoveredJob.getJobID()),
                        throwable));
    }
}
这里开始运行job
runJob(createJobMasterRunner(recoveredJob), ExecutionType.RECOVERY);
先进入createJobMasterRunner(recoveredJob)
private JobManagerRunner createJobMasterRunner(JobGraph jobGraph) throws Exception {
    Preconditions.checkState(!jobManagerRunnerRegistry.isRegistered(jobGraph.getJobID()));
    return jobManagerRunnerFactory.createJobManagerRunner(
            jobGraph,
            configuration,
            getRpcService(),
            highAvailabilityServices,
            heartbeatServices,
            jobManagerSharedServices,
            new DefaultJobManagerJobMetricGroupFactory(jobManagerMetricGroup),
            fatalErrorHandler,
            System.currentTimeMillis());
}
这里的jobManagerRunnerFactory是什么呢?有两种办法可以弄清楚,一是顺着调用链路一步一步回退,找到它被创建是赋值的地方,还可以是直接进入createJobManagerRunner,找到实现类,根据类名称进行判断
这里直接进入createJobManagerRunner,找到实现类,发现只有org.apache.flink.runtime.dispatcher.JobMasterServiceLeadershipRunnerFactory
这个时候可以看到它返回了一个JobMasterServiceLeadershipRunner
再回到runJob方法中,第一步就是启动的刚才得到的JobMasterServiceLeadershipRunner

至此,JobManager启动了!
进入start()方法,找到实现类的start()
@Override
public void start() throws Exception {
    LOG.debug("Start leadership runner for job {}.", getJobID());
    leaderElectionService.start(this);
}
事情变得熟悉起来,再进leaderElectionService.start(this),其实就是需要找Contender并分析grantLeadership方法的执行
那么直接找到LeaderContender的实现类,刚才得到的JobMasterServiceLeadershipRunner也是它的实现类,那么找到grantLeadership方法,注意这里的runIfStateRunning运行的是一个线程
@Override
public void grantLeadership(UUID leaderSessionID) {
    runIfStateRunning(
            () -> startJobMasterServiceProcessAsync(leaderSessionID),
            "starting a new JobMasterServiceProcess");
}
进入startJobMasterServiceProcessAsync(leaderSessionID)
@GuardedBy("lock")
private void startJobMasterServiceProcessAsync(UUID leaderSessionId) {
    sequentialOperation =
            sequentialOperation.thenRun(
                    () ->
                            runIfValidLeader(
                                    leaderSessionId,
                                    ThrowingRunnable.unchecked(
                                            () ->
                                                    verifyJobSchedulingStatusAndCreateJobMasterServiceProcess(
                                                            leaderSessionId)),
                                    "verify job scheduling status and create JobMasterServiceProcess"));

    handleAsyncOperationError(sequentialOperation, "Could not start the job manager.");
}
进入verifyJobSchedulingStatusAndCreateJobMasterServiceProcess(leaderSessionId),
@GuardedBy("lock")
private void verifyJobSchedulingStatusAndCreateJobMasterServiceProcess(UUID leaderSessionId)
        throws FlinkException {
    try {
        if (jobResultStore.hasJobResultEntry(getJobID())) {
            jobAlreadyDone(leaderSessionId);
        } else {
            createNewJobMasterServiceProcess(leaderSessionId);
        }
    } catch (IOException e) {
        throw new FlinkException(
                String.format(
                        "Could not retrieve the job scheduling status for job %s.", getJobID()),
                e);
    }
}
进入createNewJobMasterServiceProcess(leaderSessionId)
@GuardedBy("lock")
private void createNewJobMasterServiceProcess(UUID leaderSessionId) throws FlinkException {
    Preconditions.checkState(jobMasterServiceProcess.closeAsync().isDone());

    LOG.info(
            "{} for job {} was granted leadership with leader id {}. Creating new {}.",
            getClass().getSimpleName(),
            getJobID(),
            leaderSessionId,
            JobMasterServiceProcess.class.getSimpleName());

    jobMasterServiceProcess = jobMasterServiceProcessFactory.create(leaderSessionId);

    forwardIfValidLeader(
            leaderSessionId,
            jobMasterServiceProcess.getJobMasterGatewayFuture(),
            jobMasterGatewayFuture,
            "JobMasterGatewayFuture from JobMasterServiceProcess");
    forwardResultFuture(leaderSessionId, jobMasterServiceProcess.getResultFuture());
    confirmLeadership(leaderSessionId, jobMasterServiceProcess.getLeaderAddressFuture());
}
进入jobMasterServiceProcessFactory.create(leaderSessionId),找到实现类,就一个org.apache.flink.runtime.jobmaster.factories.DefaultJobMasterServiceProcessFactory
找到create方法
@Override
public JobMasterServiceProcess create(UUID leaderSessionId) {
    return new DefaultJobMasterServiceProcess(
            jobId,
            leaderSessionId,
            jobMasterServiceFactory,
            cause -> createArchivedExecutionGraph(JobStatus.FAILED, cause));
}
进入DefaultJobMasterServiceProcess,

这里藏得比较隐蔽,我们需要看jobMasterServiceFactory.createJobMasterService(leaderSessionId, this)
戳进去同样是来到了接口类,我们找到实现类,就一个org.apache.flink.runtime.jobmaster.factories.DefaultJobMasterServiceFactory
找到createJobMasterService方法:
@Override
public CompletableFuture<JobMasterService> createJobMasterService(
        UUID leaderSessionId, OnCompletionActions onCompletionActions) {

    return CompletableFuture.supplyAsync(
            FunctionUtils.uncheckedSupplier(
                    () -> internalCreateJobMasterService(leaderSessionId, onCompletionActions)),
            executor);
}
同样是lambda表达式调用,进入internalCreateJobMasterService(leaderSessionId, onCompletionActions)
private JobMasterService internalCreateJobMasterService(
        UUID leaderSessionId, OnCompletionActions onCompletionActions) throws Exception {

    final JobMaster jobMaster =
            new JobMaster(
                    rpcService,
                    JobMasterId.fromUuidOrNull(leaderSessionId),
                    jobMasterConfiguration,
                    ResourceID.generate(),
                    jobGraph,
                    haServices,
                    slotPoolServiceSchedulerFactory,
                    jobManagerSharedServices,
                    heartbeatServices,
                    jobManagerJobMetricGroupFactory,
                    onCompletionActions,
                    fatalErrorHandler,
                    userCodeClassloader,
                    shuffleMaster,
                    lookup ->
                            new JobMasterPartitionTrackerImpl(
                                    jobGraph.getJobID(), shuffleMaster, lookup),
                    new DefaultExecutionDeploymentTracker(),
                    DefaultExecutionDeploymentReconciler::new,
                    BlocklistUtils.loadBlocklistHandlerFactory(
                            jobMasterConfiguration.getConfiguration()),
                    initializationTimestamp);

    jobMaster.start();

    return jobMaster;
}
OHHHHHHHHHH!
这里找到了JobMaster!创建JobMaster并启动它!
TODO: 后续TM的启动运行